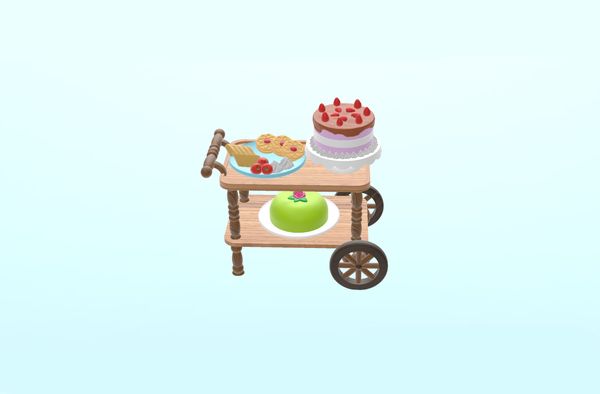
Tea is served in the picturesque garden in the afternoon sun. The kids are eagerly watching The Tea Cart and its platters with cake and biscuits from the town Bakery.
The Tea Cart is one of my old designs but I would like to share it here for two reasons, it's simplicity and it's painting.
Simplicity
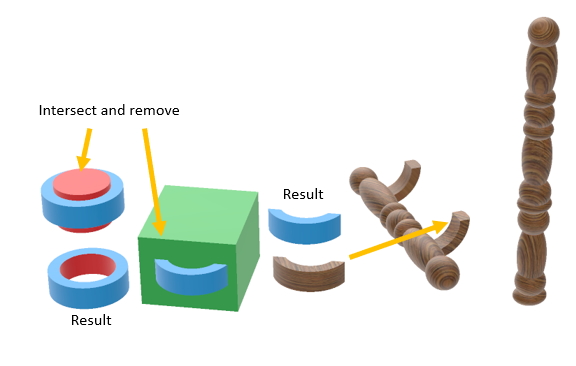
I created the Tea Cart when I was still only creating things by combining basic shapes like cubes, cylinders, spheres etc. Microsofts 3D builder is enough to create this simple Tea Cart, and yet I think it looks quite cute.
Look closely on all shapes in the legs and you will see that they are simply made of spheres which have just been squished more or less to create an "old feel". The handle is just the upper part of the leg. The two supports attaching the handle to the cart is created by intersecting basic shapes.
This is of course not the easiest way to get to the shape you want, with a CAD program or similar you get the correct shape much faster. However, if you are completely new to 3D design, and think that you could never create something like a Tea Cart, then I hope I can convince you that you are wrong. Even with the most basic shapes there are an abundance of things to create, and once you feel comfortable with combining and intersecting basic shapes you can start exploring better design methods. I am still a beginner, and yet I manage to create things that are good enough to make at least my kids happy!
If you want to help your kids get started with designing in 3D, I believe it is good to start with only basic shapes. After a while they will start seeing the basic shapes in the world around them and find simple structures that are possible to draw and print. This is only my belief since it seems to work on my son, I have absolutely no other proof to this statement :)
Painting
My painting skills are…well…limited to say the least. Mostly I'm just trying to create clean lines between colors and not to daub too much. The colors I use gets halfway dry pretty fast and unwanted strokes can be painted over quickly.
However, for the Tea Cart I wanted a sort of wooden feel. This was my first time trying something similar and I am sure there are much better techniques for this than mine. I will share how I did it, feel free to send me a suggestion on how to do it better next time!
The handle, legs and wheels are just dark brown so not much to mention there. For the tea cart top and shelf I first mixed brown, white and yellow to get a light wooden color. I covered the parts completely and then, while the paint was still wet, added thin parallel, but not too straight, dark brown lines over the parts. Then, with a slightly wet small brush, I started to smear out the dark brown lines carefully, mixing them with the still wet light brown base paint, thus creating a grained look.
 \
\
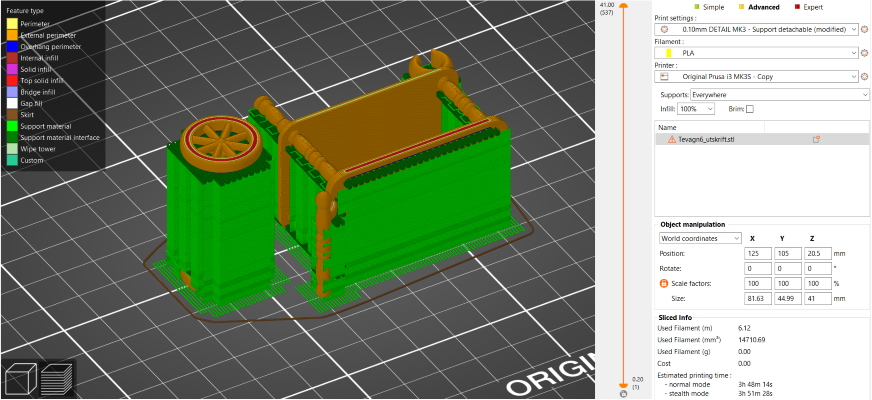
How to print?
The design is available at Thingiverse and Prusa Community and comes in two parts, wheels and cart. Wheels are easily snapped on to the cart.
Turn the parts on the side on the print bed. Some support is needed to the top wheel and to the top legs. I printed this on my old Flashforge printer, so the picture below is just my guess for what I would use in the Prusa slicer.